This guide explains how to set up payroll in Xero for integration with RosterElf. By following these steps, you’ll be able to configure payroll calendars, assign pay items, and set up pay templates. This setup ensures accurate payroll calculations aligned with your award rates, simplifying payroll processing and keeping everything up-to-date when changes are made.
1. Create a new payroll calendar (NZ only)
In this section, you’ll create a new payroll calendar in Xero (New Zealand Xero users only) specifically for RosterElf. This calendar will serve as the basis for all employee scheduling and payroll alignment, ensuring that employee hours match the Xero payroll cycle.
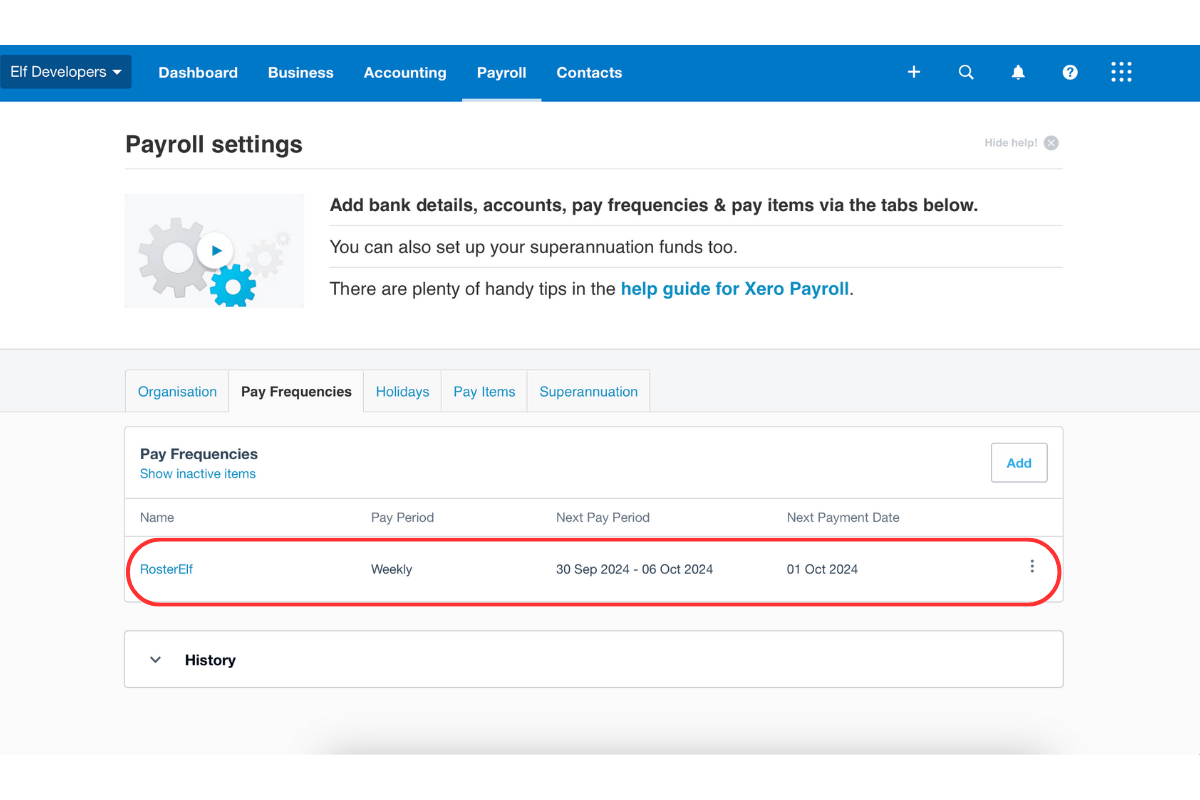
1.1 set up the RosterElf payroll calendar in Xero
1.1.1 Go to Payroll - Payroll Settings - Pay Frequencies - New Calendar.
1.1.2 Name the new calendar “rosterelf” to identify it in your settings quickly.
1.1.3 Save the new calendar.
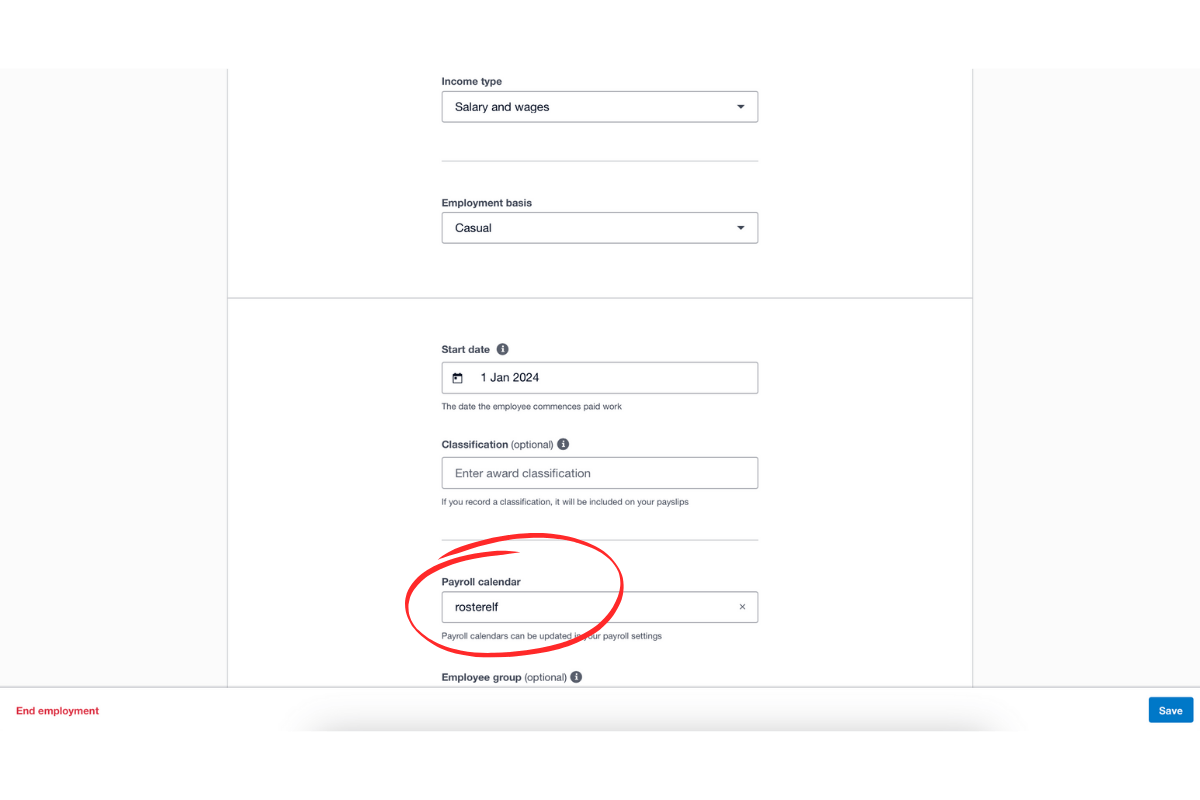
2. Assign the payroll calendar to employees
After creating the RosterElf calendar, you’ll need to assign it to each employee. This ensures that payroll calculations follow the new calendar’s schedule.
2.1 assign RosterElf calendar to employees
2.1.1 Go to Payroll settings - Employees - Employment.
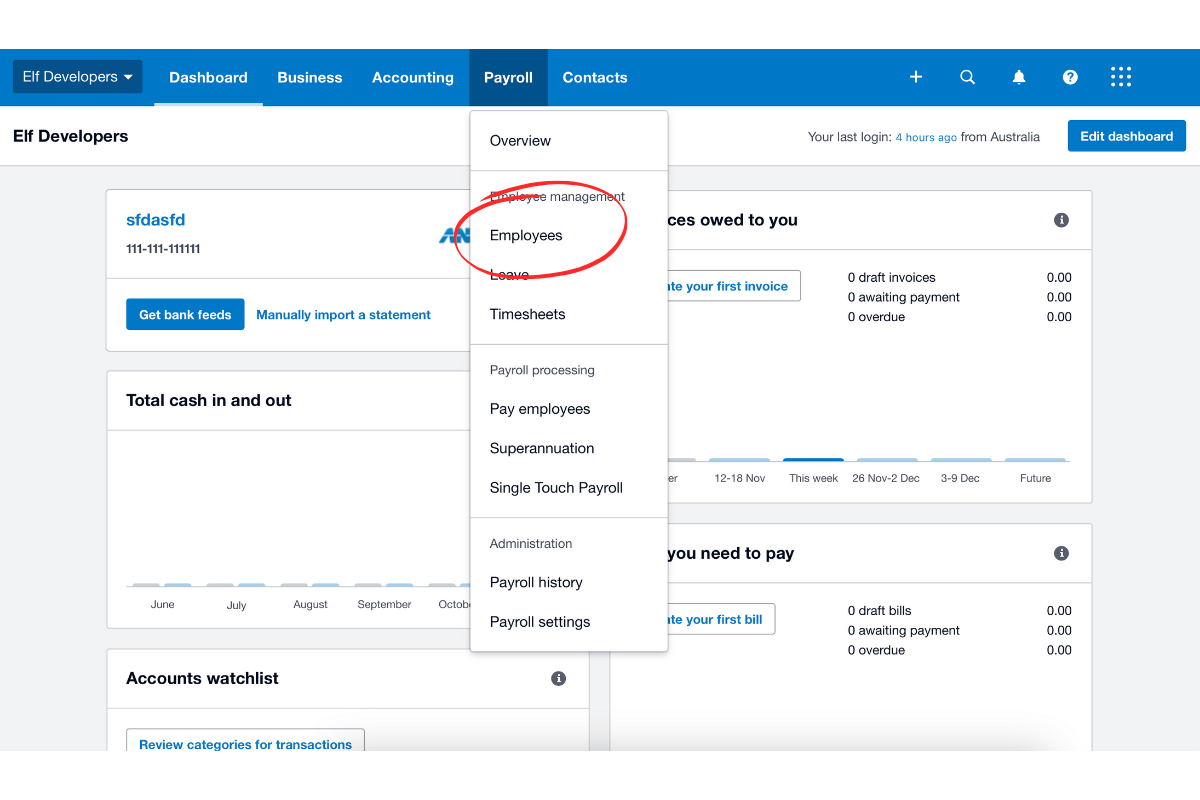

2.1.2 Under each employee’s profile, navigate to Payroll Calendar and select “rosterelf” from the options.
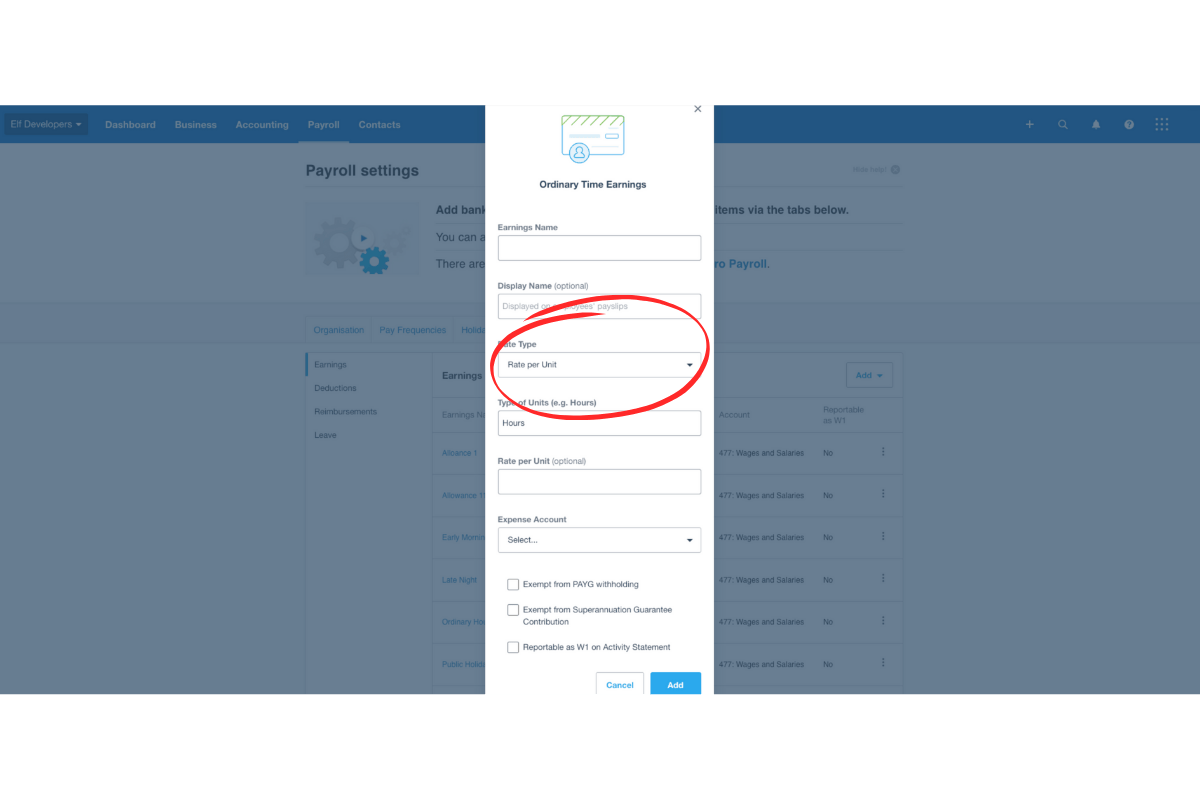
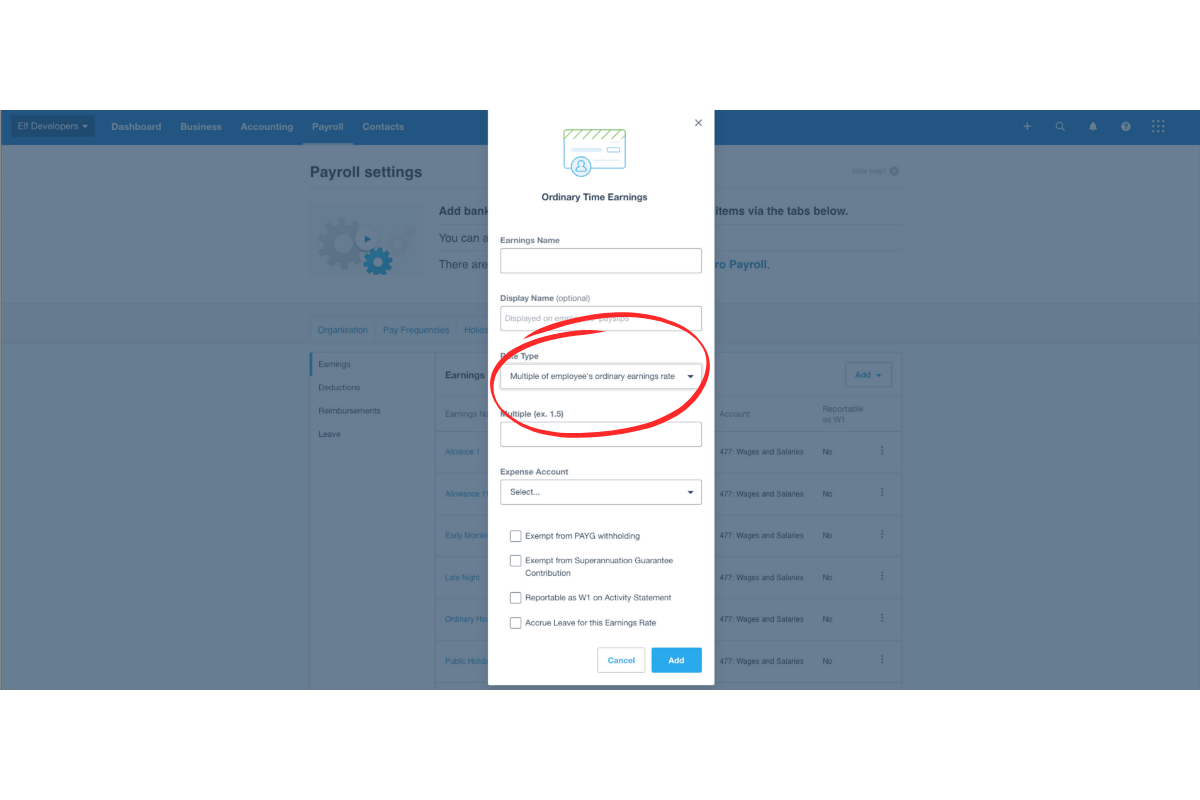
3. Set up pay items for awards
Now, create pay items in Xero based on your award requirements. Xero offers two options: fixed-rate items or multipliers. Multipliers are recommended, as they automatically adjust based on employee base rates.
3.1 create pay items based on award rates
3.1.1 Go to Payroll - Payroll Settings - Pay Items.
3.1.2 Click Add Item to create a new pay item.
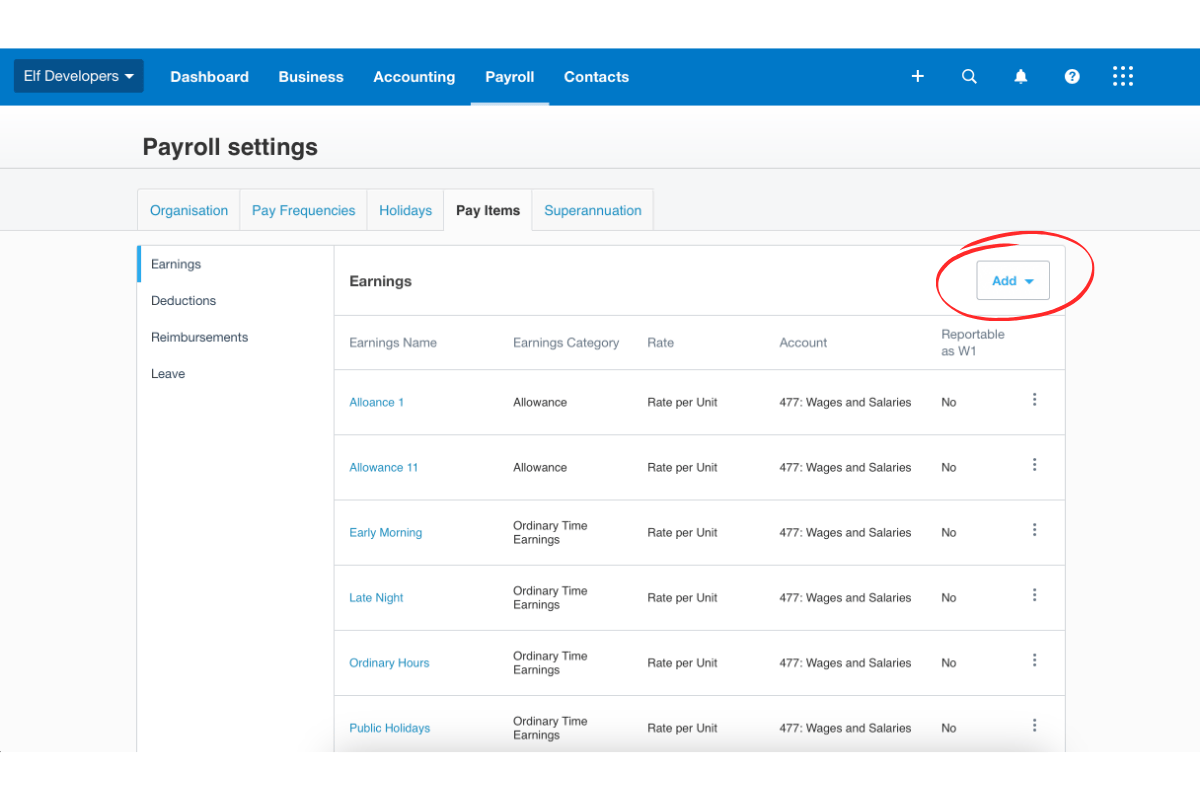
3.2 choose pay item format
3.2.1 Fixed rate per unit: Create specific items for each classification. For example: Early morning rate 16 years or Early morning rate 17 years. Note: when typing “Hours”, avoid spaces after the “s” to avoid data errors.
3.2.2 Multiplier: Set up a multiplier item to adjust according to employee base hours, requiring less manual updating.
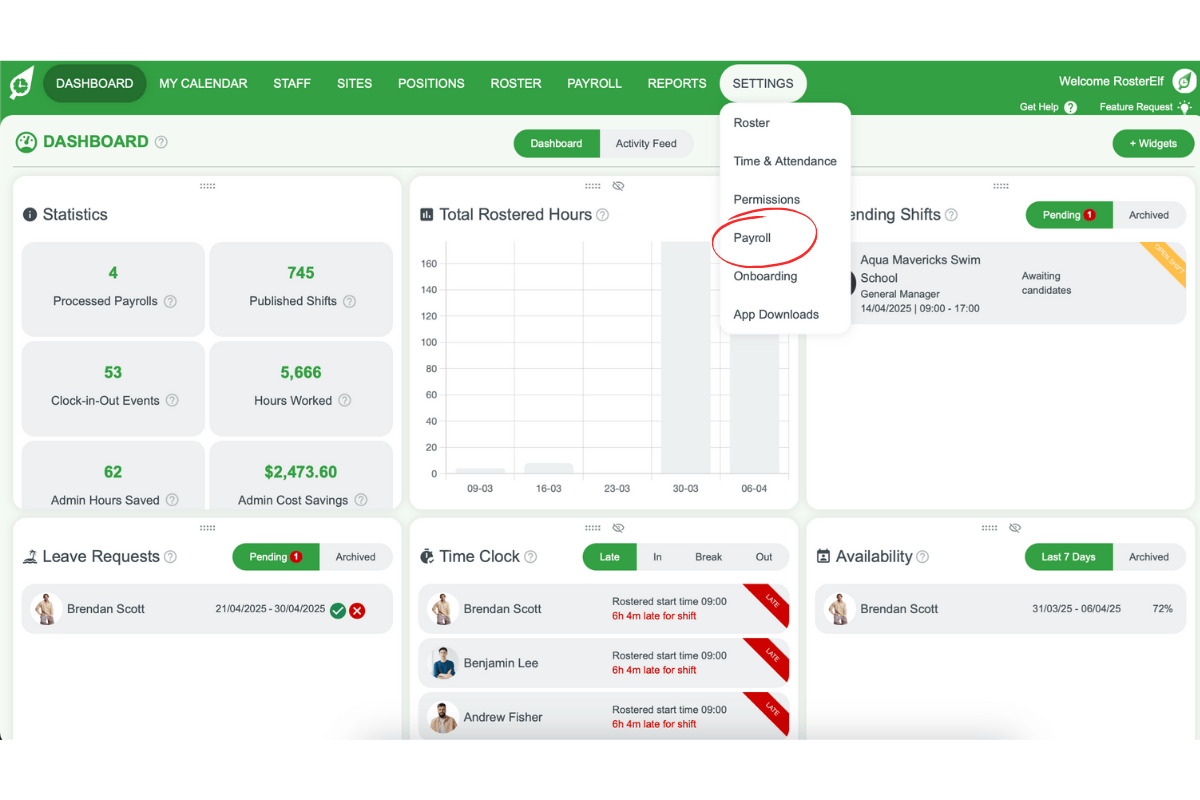
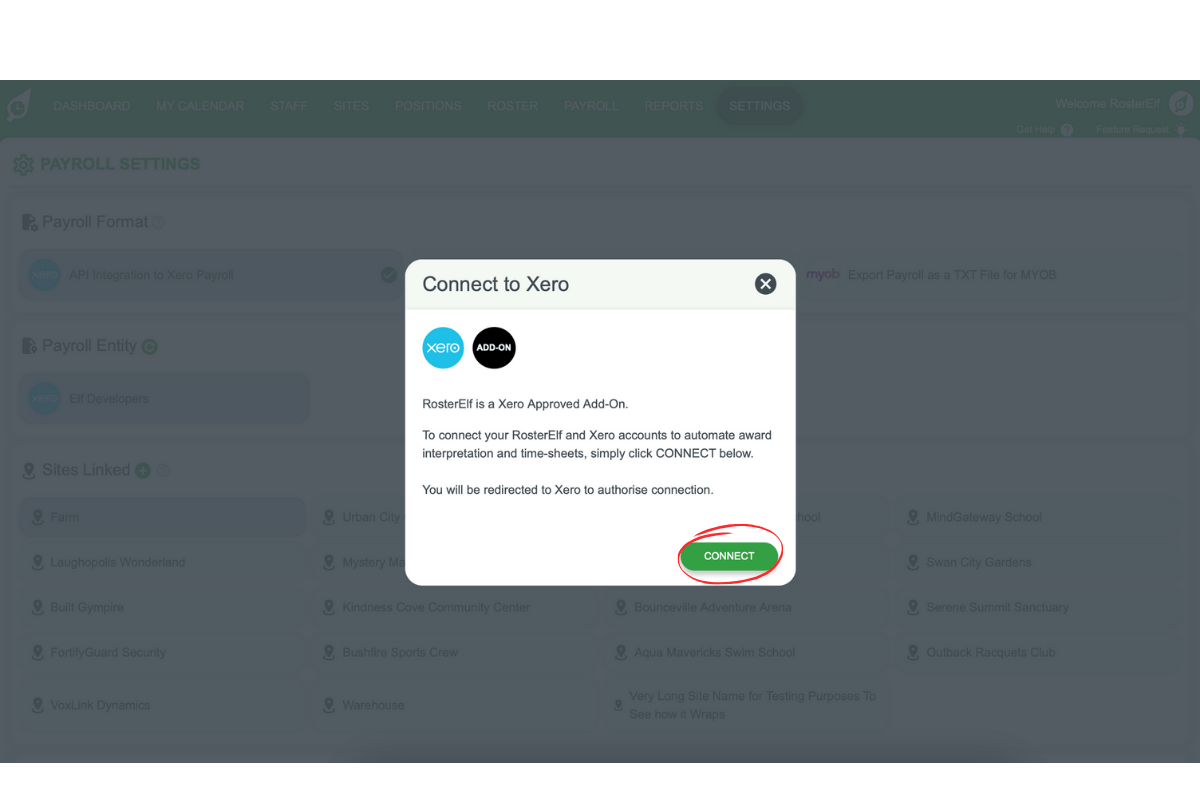
4. Connect RosterElf to Xero
In this step, you’ll connect RosterElf to Xero through the API. This integration enables the direct flow of roster data into Xero’s payroll system.
4.1 link RosterElf with Xero
4.1.1 Log in to RosterElf and go to Settings - Payroll.
4.1.2 Select Reconnect to Xero.
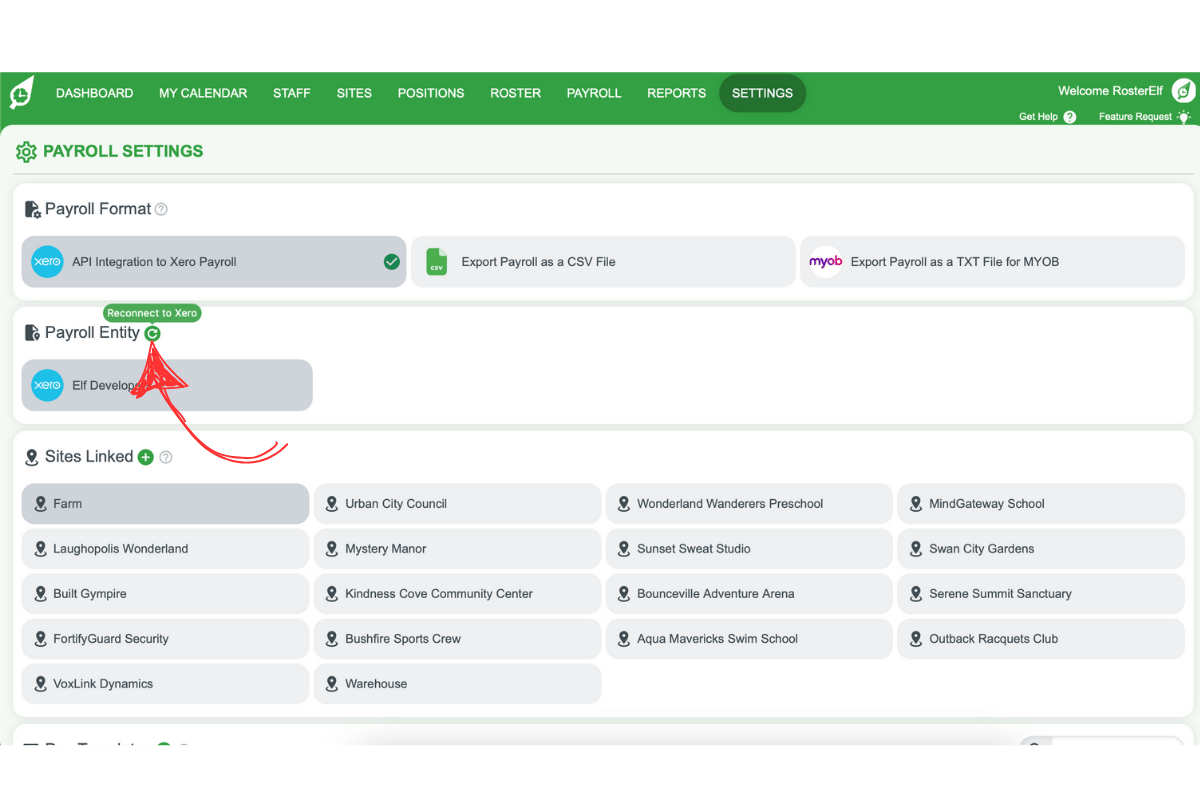
4.1.3 You’ll be redirected to Xero—sign in and select the organisation to connect.
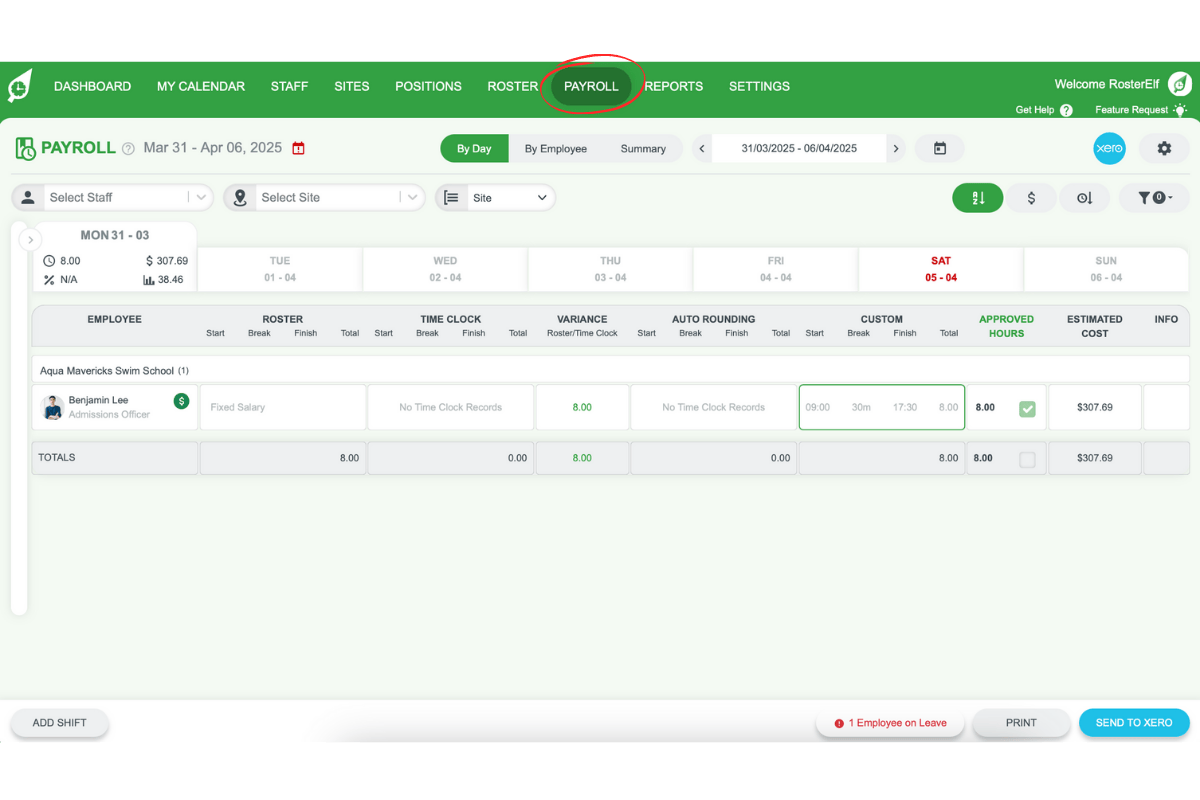
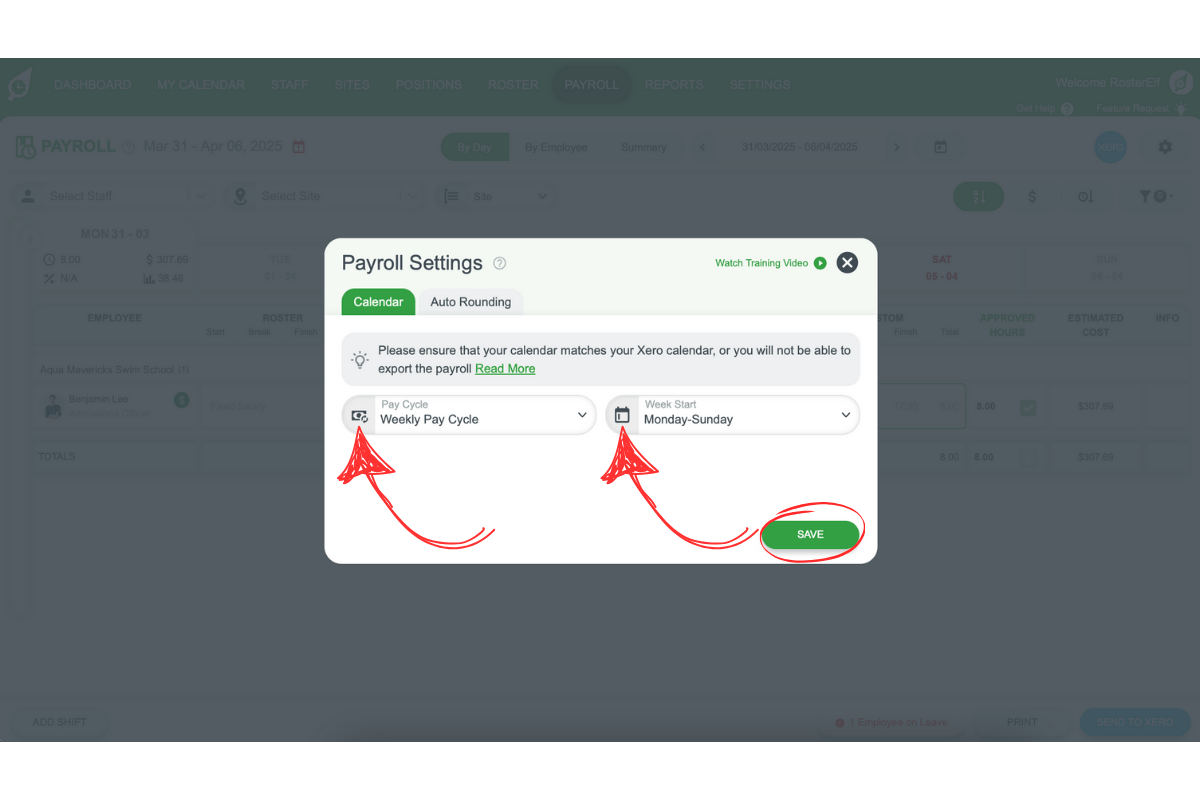
5. Align payroll calendars
Once connected, align your RosterElf payroll calendar with Xero’s to ensure accurate payroll processing.
5.1 match payroll calendars
5.1.1 Go to Payroll in RosterElf.
5.1.2 Click on the settings gear on the top right of the screen to access Payroll Settings.
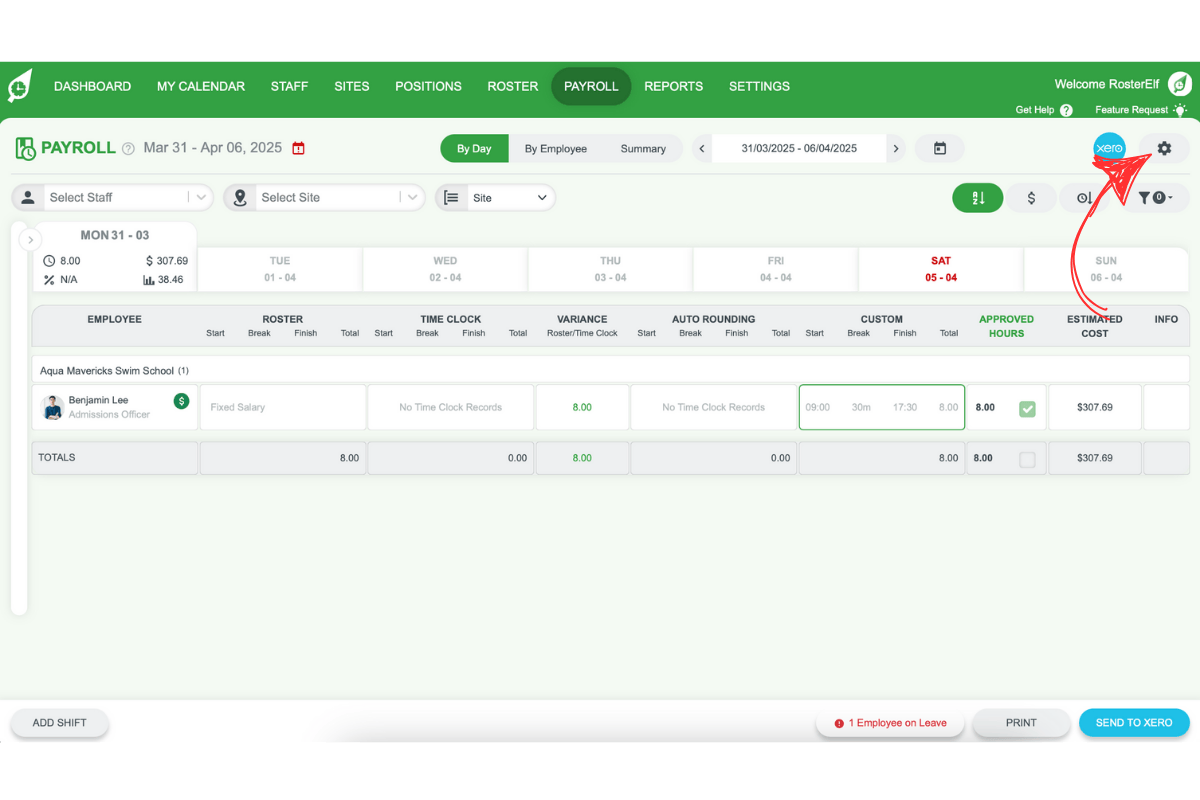
5.1.3 Ensure the RosterElf pay calendar matches the one you created in Xero.
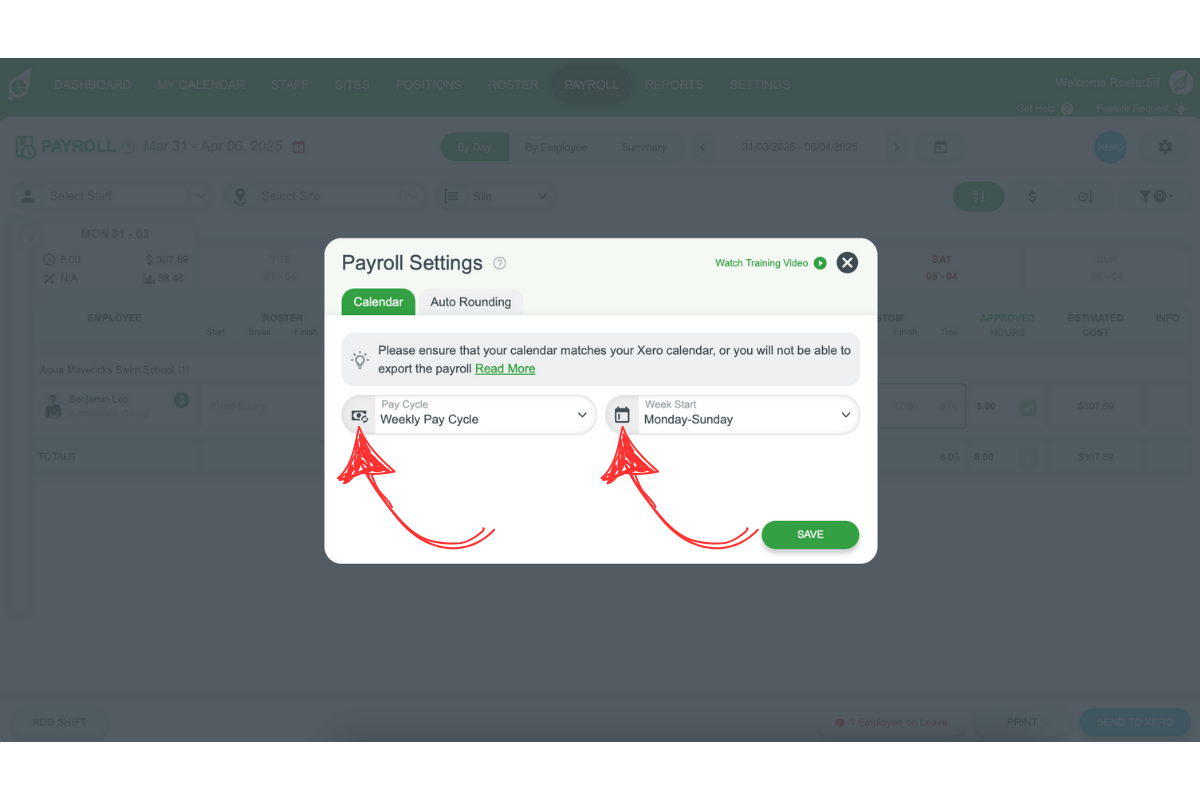
5.1.4 If they don’t match, amend as required and click Save.
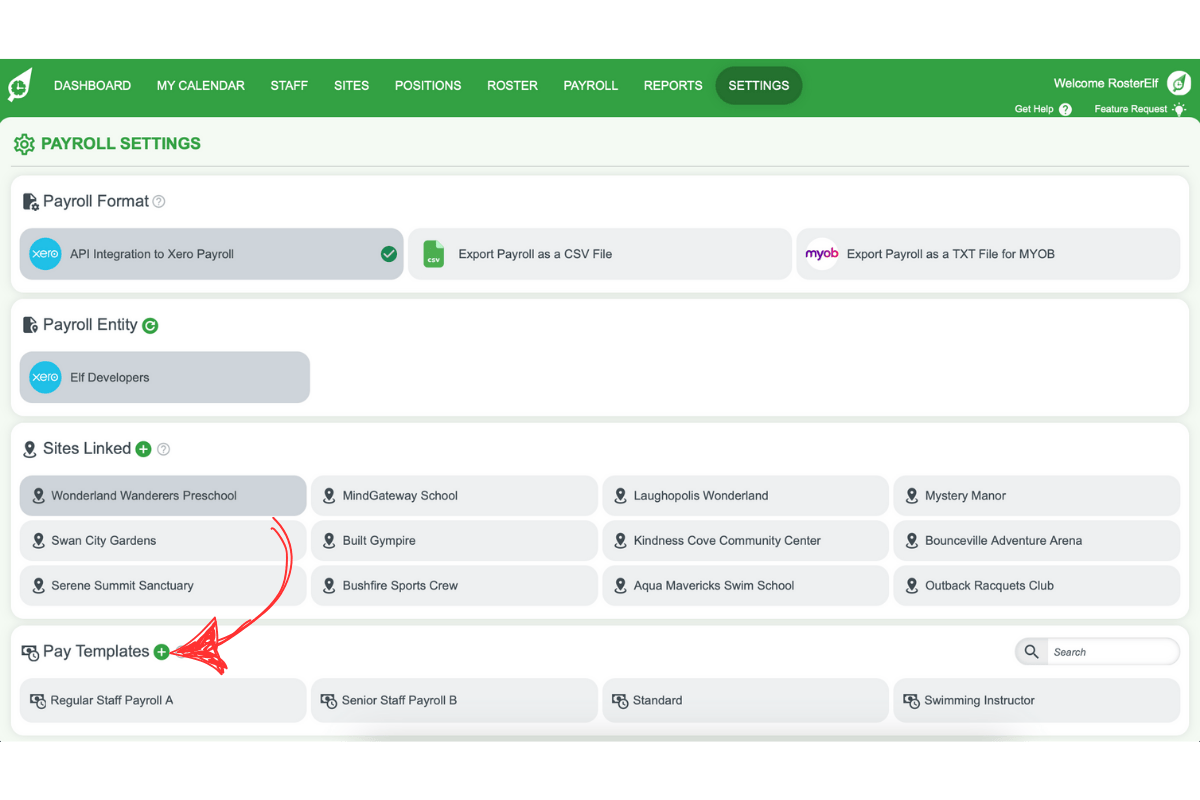
6. Create pay templates
Lastly, set up pay templates in Xero to simplify payroll processing. Pay templates save time and help standardise pay across employees.
6.1 set up pay templates
6.1.1 Go to Settings - Payroll.

6.1.2 In the Pay Template area, click the green plus symbol to add a new template, which can be customised as needed.
6.1.3 Pay template explained:
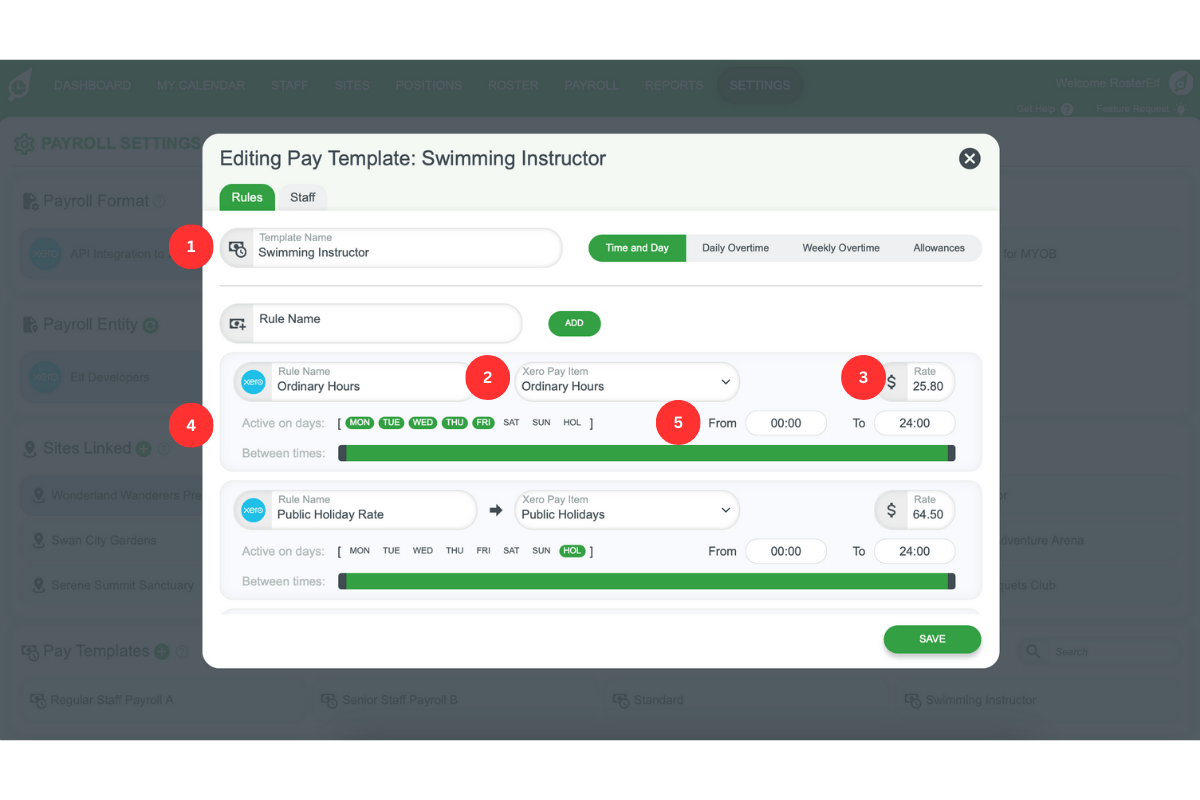
1. Pay Template Rule Name: Assign a name for internal reference in RosterElf.
2. Xero Pay Item: Choose a pay item from the dropdown list, which includes all active items from Xero. (If items aren’t visible, log out and back in.)
3. Budgeting Rate: Set a budgeting rate for internal budgeting. This does not impact Xero but should align with your budgeting setup if desired.
4. Active on Days: Select the days when each rule applies. Mon-Sun are self-explanatory, and Hol applies to public holidays.
5. Relevant Hours: Define the time range for each rule using the slider or by entering specific start and end times.
Frequently asked questions
1. How do I create a new payroll calendar for RosterElf in Xero?
To create a new payroll calendar for RosterElf, go to Payroll Payroll settings Frequencies New Calendar in Xero, name the calendar RosterElf, and save it. This calendar will align employee scheduling and payroll processing in Xero with RosterElf.
2. How can I assign the RosterElf payroll calendar to employees in Xero?
Assign the RosterElf payroll calendar by going to Payroll settings Employees Employment. Under each employee’s profile, select RosterElf from the Payroll Calendar options. This ensures payroll calculations align with the new calendar’s schedule.
3. What if I can't find my award?
If you’re unable to locate your award, refer to the Fair Work website for assistance.
4. How do I connect RosterElf to Xero for payroll integration?
To connect RosterElf to Xero, log in to RosterElf, go to Settings Payroll, and select API Connection to Xero. After being redirected to Xero, sign in and select the organisation you wish to connect.
5. Why should I create pay templates in Xero for RosterElf payroll?
Creating pay templates in Xero simplifies payroll processing and ensures consistent pay across employees. Go to Settings Payroll Pay Templates in Xero and add a new template to standardise your payroll setup.
6. Do I need to create a new pay calendar in Xero for Rosterelf?
Only if your business is in New Zealand. Australian businesses can use their existing calendar with Xero payroll integration.