Setting up multi-factor authentication (MFA) on your account
This article explains how to set up Multi-Factor Authentication (MFA) for your RosterElf account. Enabling MFA provides an additional layer of security by requiring multiple forms of verification before accessing sensitive information. For users who handle personally identifiable staff data or payroll information, activating MFA strengthens security against cyber attacks. This article details the steps to enable and disable MFA, ensuring you meet security standards and, where applicable, legislative requirements. You’ll find straightforward instructions for adding or removing MFA from your account, helping you protect sensitive data and enhance your team’s security practices.
1. Understanding multi-factor authentication (MFA)
In this section, you’ll learn about Multi-Factor Authentication (MFA) and why it’s important for safeguarding sensitive data on RosterElf. MFA requires users to verify their identity through two or more verification steps, making it difficult for unauthorised individuals to access your account. This is particularly beneficial for users with elevated permissions handling staff or payroll information.
1.1 Benefits of using MFA
1. Enhanced Security: MFA reduces the risk of unauthorised access, safeguarding personal and payroll information.
2. Compliance: For Xero-integrated accounts, MFA is mandatory, helping meet legal security requirements.
3. Peace of Mind: Additional verification steps provide a secure environment for staff and payroll data management.
2. Enabling MFA on your account
This section covers how to activate MFA on your RosterElf account. Enabling MFA is recommended for all users with elevated permissions, such as Assistant Manager, Manager, Payroll Manager, or Admin, to protect access to sensitive information. This guide ensures you can enable MFA smoothly and understand the added security it provides.
2.1 Steps to enable MFA
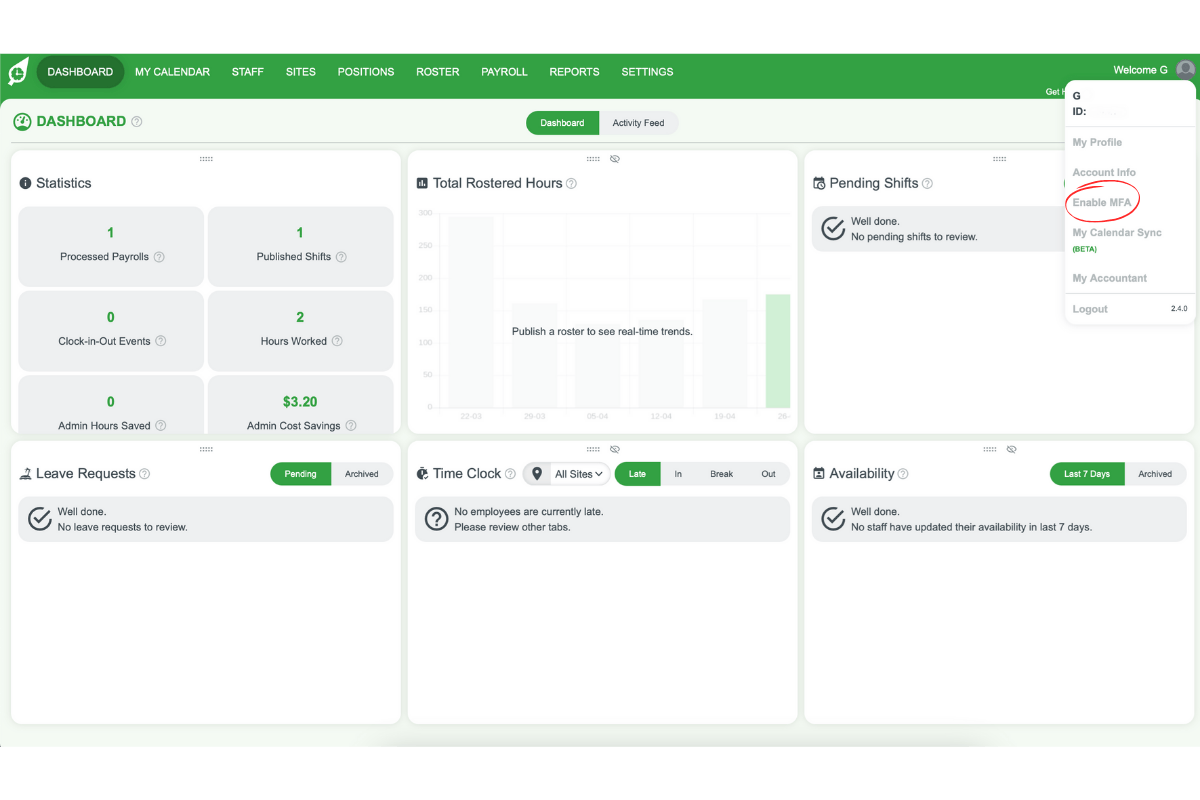
2.1.1 Access Your Profile:
- Click on your profile image in the top right corner of your RosterElf screen.
- Select Enable MFA.
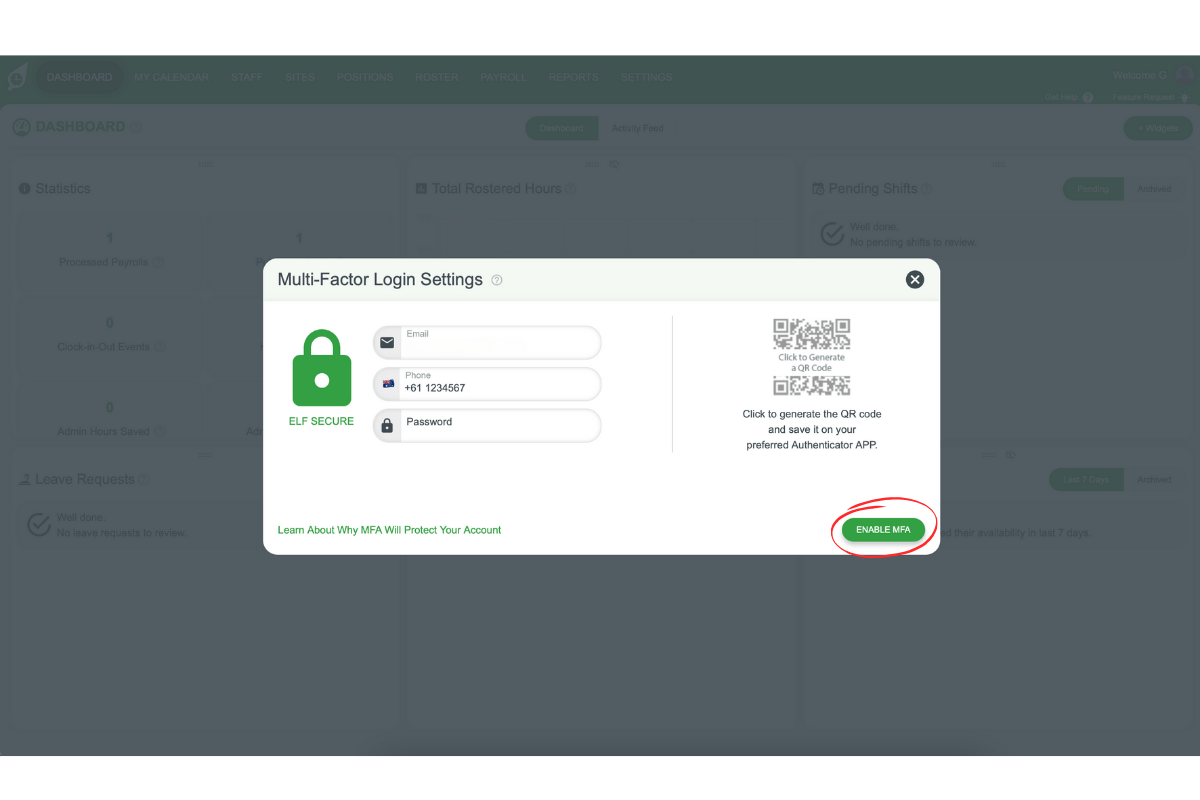
2.1.2 Verify Your Details:
- Confirm your mobile number is correct.
- Enter your password.
Once MFA is active, RosterElf will send a verification code by SMS each time you log in. If the code doesn’t arrive, see SMS verification code not received for troubleshooting steps.
2.1.3 Confirm MFA Activation: Click Enable MFA.
3. Disabling MFA on your account
If you need to disable MFA, follow the steps below. Keep in mind that disabling MFA reduces your account’s security, so it’s recommended to keep it enabled unless necessary.
3.1 Steps to disable MFA
3.1.1 Click your profile image in the top right corner.
3.1.2 Select Disable MFA.
3.1.3 Confirm your choice to complete the process.
Frequently asked questions
1. What is Multi-Factor Authentication (MFA)?
MFA is a security feature that requires two or more verification methods to access your account, adding an extra layer of protection beyond just a password.
2. Who should enable MFA on their RosterElf account?
MFA is recommended for all users with elevated permissions, such as Assistant Manager, Manager, Payroll Manager, or Admin, who access sensitive staff or payroll information.
3. Is MFA mandatory for Xero-integrated accounts?
Yes. For accounts integrated with Xero, enabling MFA is mandatory to comply with security requirements.
4. Can I disable MFA after enabling it?
Yes. You can disable MFA at any time by accessing your profile settings and selecting Disable MFA.
5. What happens if I lose access to my MFA device?
Contact RosterElf support for assistance in regaining access to your account. You may need to verify your identity through alternative methods.
6. Why am I not receiving my MFA SMS code on my iPhone?
If you are not receiving your MFA SMS code on your iPhone, please check your SMS spam or filtered messages folder. On iPhone, filtered or unknown messages can sometimes prevent MFA codes from appearing in your main inbox. See the SMS verification code not received guide for full troubleshooting steps.